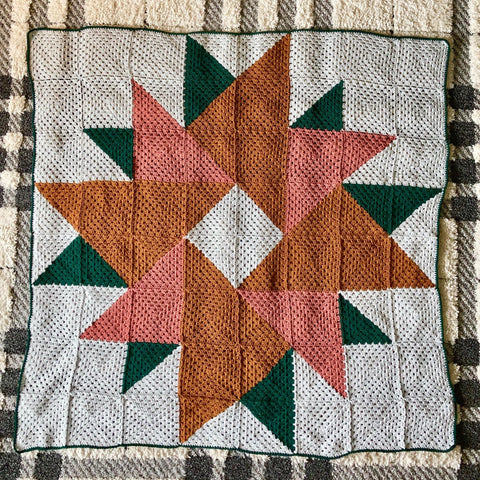
A beginner-friendly crochet blanket - The Bloom Blanket - is a free pattern here on the blog! Read on to learn about the design inspiration and all materials needed to create this crochet blanket.
Copyright Disclosure
This pattern is for your own personal use. No unauthorized reproduction, in whole or in part (i.e. copying and pasting this pattern into your own document, altering this pattern in any way and calling it your own, etc.), or distribution of this pattern or content (i.e. sharing this pattern in its whole form on your own blog) is allowed. You can use this blog post in blog round-ups. I give permission to sell your items made from this pattern. Please credit “While They Dream” in your listings. The pattern and all photos are the property of While They Dream. You are welcome to share my patterns across all social media forms as long as you link back to my blog directly.
Inspiration
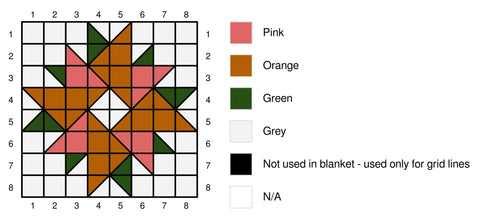
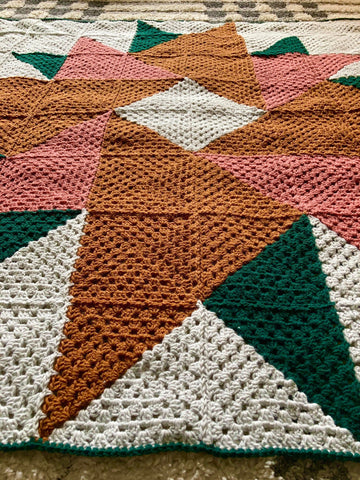
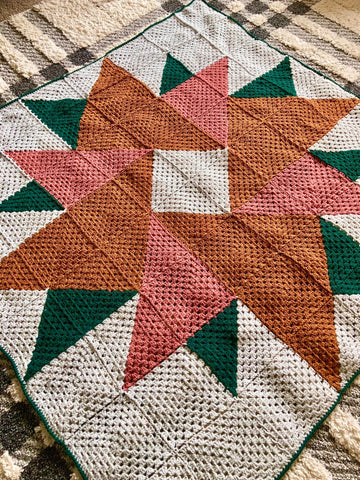
This crochet blanket was inspired by large quilt blocks that you might see on the side of a barn. I've been absolutely in love with designing quilt-style crochet blankets for several years now. Typically these have been done with smaller pieces, so for this one I wanted something large scale. Each square is approximately 9 inches (23 cm).
Sizes
The finished dimensions for this blanket are approximately 72 inches (183 cm) wide and tall, however, if you wanted to make this blanket on a smaller scale all you would need to do to alter that is do less rounds on your crochet granny squares. 4 or 5 rounds instead of 7 would give you baby blanket or throw blanket sizes.
Supplies Needed
- Crochet Hook: 6mm/J – adjust your hook size if you adjust the yarn weight. I love using Furls Hooks. They are so comfortable and I don’t get stressed hands or wrists like I once did. Use the code HOOK15 for 15% off.
- Yarn: Any Worsted Weight yarn.
- Colors Used and Yardage: I used Lion Brand Pound of Love for this project.
- Elephant Gray – Two skeins needed or 30 oz (850 g) / 1913 yards (1750 m)
- Terracotta – One skein needed or 6.6 oz (187 g) / 421 yards (385 m)
- Pumpkin Spice – One skein needed or 13.5 oz (383 g) / 861 yards (787 m)
- Hunter Green – One skein needed or 5 oz (142 g) / 319 yards (292 m)
- I also used Hunter Green for the Border. I only used approximately 1 oz (28 g) / 64 yards (59 m) for the border.
Stitch Abbreviations
- MC – Magic Circle
- Ch – Chain
- DC – Double Crochet
- Slst – Slip Stitch
Other Notes
- Border: I did a simple single crochet border around the perimeter of the blanket. To do this: join your yarn in any stitch along the edge of your blanket. Single crochet in each stitch. When you come to corner stitches along the edge of your blanket where your squares join, place one single crochet stitch in that chain space. When you come to your actual corners, place 3 single crochet stitches in that chain space.
- Joining your squares: You can use any joining method that you’re comfortable with. I joined my squares as I went. You can find many different joining techniques on YouTube or you can choose to hand sew your squares together, single crochet them together (with right sides facing each other), etc.
A note about the solid and half and half granny squares:
- I use a method that enables you to never have to flip your work when making the solid granny squares and ensures that your granny square never starts slanting. Your square will come out super square with no blocking.
- For both of the squares: I do not make any Ch 1’s between my 3 DC clusters; if you find that you crochet tightly and it’s doing funny things to your square you can do a Ch 1 between your 3DC Clusters.
- Lastly, Ch 3 at the beginning of your round always counts as a DC.
GET THE BLOOM BLANKET PATTERN
Get the Bloom Blanket pattern from my shop and save big when you bundle 3 or more patterns. See the codes below.
- You can find the PDF Pattern HERE
- Get the Bloom Blanket Kit from Lion Brand Yarn HERE
- Add this to your Ravelry Favorites: CLICK HERE
- Grab the PDF Pattern on Love Crafts: CLICK HERE
- Get the pattern on Etsy: CLICK HERE
PATTERN DISCOUNT CODES:
- SAVE10 - Purchase 3+ Patterns and get 10% off
- SAVE15 - Purchase 5+ Patterns and get 15% off
- SAVE20 - Purchase 8+ Patterns and get 20% off

Crochet the Solid Granny Square
Please be sure you have read the notes section before beginning.
Round 1: Make a Magic Circle (or chain 4, slst into the first ch to make a circle). Ch 3, 2 DC into circle. *Ch 2, 3 DC into circle* repeat two more times, Ch 2 and join with a slst to the top of the Ch 3. Tighten your magic circle. Make 3 slsts: 2 into the next two sts and 1 into the corner space.
Round 2: (Ch 3, 2 DC, Ch 2, 3 DC) into the corner space, *(3 DC, Ch 2, 3 DC) into the next corner space* repeat two more times in each corner space. Join with slst to the top of the Ch 3. Make 3 slsts: 2 into the next two sts and 1 into the corner space.
Round 3: (Ch 3, 2 DC, Ch 2, 3 DC) into the corner space, *3 DC into the space between your 3 DC clusters from the previous round. (3 DC, Ch 2, 3 DC) into the next corner space* repeat two more times. 3 DC into the space between your 3 DC clusters from the previous round. Join with slst to the top of the Ch 3. Make 3 slsts: 2 into the next two sts and 1 into the corner space.
Round 4: (Ch 3, 2 DC, Ch 2, 3 DC) into the corner space, *3 DC into each of the spaces between each of your 3 DC clusters from the previous round. (3 DC, Ch 2, 3 DC) into the next corner space* repeat two more times. 3 DC into each of the spaces between your 3 DC clusters from the previous round. Join with slst to the top of the Ch 3. Make 3 slsts: 2 into the next two sts and 1 into the corner space.
Rounds 5 – 7: Repeat Round 4, omitting the 3 slsts at the end of Round 7.
To Make a Half and Half Square
Please be sure you have read the notes section before beginning.
Round 1: With Color A - Make a Magic Circle (or chain 4, slst into the first ch to make a circle). (Ch 3, 2 DC, Ch 2, 3 DC) into the circle. Ch 1 and stop. Do not cut your Color A; leave it to the back. With Color B, pull a loop through the Ch 1. *3 DC, Ch 2* repeat once more. Tighten your Magic Circle. Join with a slst to the top of the Ch 3. Turn your work to the opposite side and slst into the Ch 2 space you just made.
Round 2: Continuing with Color B - Ch 3, 2 DC into the corner space. (3 DC, Ch 2, 3 DC) into the next corner space. 3 DC, Ch 1 into the next corner space and stop. Do not cut Color B; leave it to the front. With Color A, pull up a loop through the Ch 1. 3 DC into the corner space. (3 DC, Ch 2, 3 DC) into the next corner space. 3 DC, Ch 2 in the next corner space. Join with a slst to the top of the Ch 3. Turn your work to the opposite side and slst into the Ch 2 space you just made.
Round 3: Continuing with Color A - Ch 3, 2 DC into the corner space. *3 DC into each of the spaces between your 3 DC clusters from the previous round. (3 DC, Ch 2, 3 DC) into the next corner space. 3 DC into each of the spaces between your 3 DC clusters from the previous round*. 3 DC, Ch 1 into the next corner space and stop. Do not cut Color A; leave it to the back. With Color B, pull up a loop through the Ch 1. 3 DC into the corner space. Repeat from * to *. 3 DC, Ch 2 in the next corner space. Join with a slst to the top of the Ch 3. Turn your work to the opposite side and slst into the Ch 2 space you just made.
Round 4: Continuing with Color B - Ch 3, 2 DC into the corner space. *3 DC into each of the spaces between your 3 DC clusters from the previous round. (3 DC, Ch 2, 3 DC) into the next corner space. 3 DC into each of the spaces between your 3 DC clusters from the previous round*. 3 DC, Ch 1 into the next corner space and stop. Do not cut Color A; leave it to the front. With Color A, pull up a loop through the Ch 1. 3 DC into the corner space. Repeat from * to *. 3 DC, Ch 2 in the next corner space. Join with a slst to the top of the Ch 3. Turn your work to the opposite side and slst into the Ch 2 space you just made.
Rounds 5 and 7: Repeat Round 3 | Round 6: Repeat Round 4
How to Assemble the Bloom Blanket